
ragingspeedhorn
New Member
Here is the 2 best tutorials which has been written on how to make a custom loadignscreen using 1 or 4 images. I however claim no rights on any of these since I am not the creator. 4 picture loadingscreen made by Sopho, 1 image loadingscreen tutorial made by SD_Ryoko, all credits go to them.
Enjoy")
Enjoy
How to make a custom loadingscreen using 4 images
1. You need a 1024 x 768 pixles image or a reasonable size as your custom loading screen. (must be quite large)
If you have problems doing this, try resizing with a easier paint program. (I highly suggest Irfanview as I will be using Irfanview for the whole of this Tutorial )
I got myself an interesting image
<img width=\\"501\\" class=\\"attach\\" src=\\"http://server5.uploadit.org/files/Sophos-CustomLoadingScreenTutP1.jpg\\" border='0' alt=\\"IPB Image\\" />
Now to resize...
<img width=\\"501\\" class=\\"attach\\" src=\\"http://server5.uploadit.org/files/Sophos-CustomLoadingScreenTutP2.jpg\\" border='0' alt=\\"IPB Image\\" />
Heh, done
<img width=\\"501\\" class=\\"attach\\" src=\\"http://server5.uploadit.org/files/Sophos-CustomLoadingScreenTutP3.jpg\\" border='0' alt=\\"IPB Image\\" />
2. Slice the 1024 x 768 image for your custom loading scren into 4 parts. (like dividing a piece of cake into 4) NOW FOLLOW CAREFULLY THIS PART - Bottom left and bottom right sliced parts of the image MUST be 512 x 256 pixles and Top left and Top Right parts MUST be 512 x 512 pixles. TIP: Crop the images slowly by hand with a good and easy to use paint program. Also look at the screenshots.
Bottom left (freehand crop)
<img width=\\"501\\" class=\\"attach\\" src=\\"http://server5.uploadit.org/files/Sophos-CustomLoadingScreenTutP4.jpg\\" border='0' alt=\\"IPB Image\\" />
Top left (freehand crop)
<img width=\\"501\\" class=\\"attach\\" src=\\"http://server5.uploadit.org/files/Sophos-CustomLoadingScreenTutP5.jpg\\" border='0' alt=\\"IPB Image\\" />
3. Once you've done that, you should have 4 parts of the loading screen image. You can do it after or before imporing them into your map, but I suggest renaming them now. Now rename the parts:
Bottom Left part > LoadingScreenBL
Bottom Right part > LoadingScreenBR
Top Left part > LoadingScreenTL
Top Right part > LoadingScreenTR
Renaming all 4 parts

4. Convert ALL of the parts (make sure they are renamed correctly) to .tga or .blp TIP: I recommend .blp as its much smaller but there are more problems with it. 28/5/04 < I have discovered the problem with why some loading screen parts will not work even though they are converted to .blp. This is because: the .tga bits are not high enough, 32 bits is required, it hasn't got alpha channels. If you just want to insert a opaque alpha channel then use Wc3 Viewer to do it for you easily.
5. Ok, put them in a folder for easy acess for the next step. This is optional.

6. Start up World Editor (or your map) and go to Import Manager.
7. Import the 4 parts of your custom Loading Screen (make sure they are renamed, resized correctly, properly converted) with Import File or Import Files...
The folder created earlier makes things easy
<img width=\\"501\\" class=\\"attach\\" src=\\"http://server5.uploadit.org/files/Sophos-CustomLoadingScreenTutP9.jpg\\" border='0' alt=\\"IPB Image\\" />
8. Once they are imported, remove their paths from w3mapImportered to just the loading screen part proper name. Eg: War3MapImported\LoadingScreenBL.blp to LoadingScreenBL.blp remove all 4 of em. The " use custom path " should be ticked.
You have to do this
<img width=\\"501\\" class=\\"attach\\" src=\\"http://server5.uploadit.org/files/Sophos-CustomLoadingScreenTutP10.jpg\\" border='0' alt=\\"IPB Image\\" />
9. Now, import the LoadingScreen.mdx file. TIP: There are specific LoadingScreens.mdx. There are 2 types. One is designed by Blizzard for .tga parts and another is modified from Blizzard's by someone from campaigncreations.org. Try to mix these together and get them right.
Below will tell you which LoadingScreen.mdx is for whether its for .tga or .blp. This is very important!
> If you are using .tga...
Export LoadingScreen.mdx from the import manager of Blizzard's " Monolith Map " and put it somewhere which you will use later, this is important or else the custom loading screen won't work! .blp won't work if you have this one but only .tga
TIP: At the end of this Tutorial there will be some needed resources for help
if you can't do this.
Get it from Monolith! (Exporting it from its Import Manager)

If you are using .blp... (recommended)
Download the specific LoadingScreen.mdx from campaigncreations.org as this specific one allows .blp parts to be the custom loading screen. A .blp custom loading screen saves tons of space so I recommend this. .tga won't work if you have this one but only .blp TIP: At the end of this Tutorial the zip file will include this specific LoadingScreen.mdx as well!
10. Minimize/exit Import manager for the " Monolith Map ". Start back your map. Go to " Scenario " on the toolbar, then go to " Map Loading Screen... " underneath it.
11. Tick " Use Imported File " and select the LoadingScreen.mdx as it. Then press ok. Note that the path of it is also displayed.
Yes! We're done!!

12. Restart (close it and open it) your map and apply the changes again to make the World Editor used to it. Then test the map, and WALLA!! congrats!
" Well done Sopho and you " - Sopho
<img width=\\"501\\" class=\\"attach\\" src=\\"http://server5.uploadit.org/files/Sophos-CustomLoadingScreenTutP14.jpg\\" border='0' alt=\\"IPB Image\\" />
How to make an loadingscreen using only 1 image
Needed Tools
This tutorial is about creating a custom loading screen. You will need Warcaft III The Frozen Throne to do this.
Before we make our screen, you will need the Warcraft III Image Extractor II. This program allows you to convert files from .TGA format to .BLP format. You can download the image tool from below. You also need to download the custom loading screen model.
You will need a decent photo-editing program to create your screen. The most important requirement is that the program can open TGA files. I am using ULEAD Photo Impact. You will also need your loading screen image. Your loading screen should be either 1024x768, or 800x600. I have selected the image below that I downloaded from an artwork site.
* Warcraft III Image Extractor II from Warcraft III Search
* ULEAD Photo Impact from ULEAD Website
* Custom loading screen file called LoadingScreen.mdx
* An image that is either 1024x768 or 800x600 in size
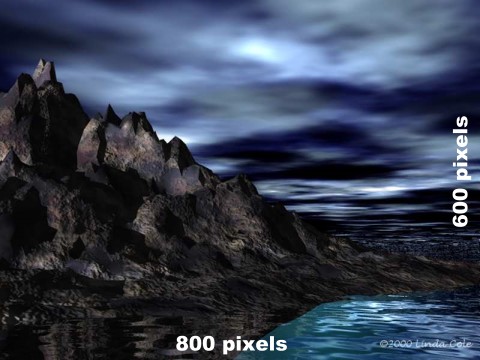
I have selected an 800x600 image.
Resizing your Image
Now we need to resize our image, and make it 512x512 square. This is going to squish the image, and it will look a little strange. The game is going to stretch your image to the size of the screen, so it will look okay when the game loads. We are going to make the image square because Textures are stored as quadratic surfaces with dimensions that are powers of 2 in video memory, so this is the most efficient size. The image is not going to lose much quality either.

Shrink the image, unproportionately, to 512x512.
Converting your Image
When we are done editing the screen, but before we import the skin into your map, we need to convert it to a BLP format. Open the Warcraft III Image Extractor, and open your new image. Then click SAVE, and save your new skin as a .BLP file. The image tool will prompt you for the image quality. Reducing the quality may save some file space in your map, but you can leave it at 100 percent. I usually use 70-75 without losing too much detail. See the difference in file size below.
* A 512 image saved at 100% is 591 kb.
* A 512 image saved at 75% is 148 kb.

Convert your image to BLP format.
Importing your Files
Inside World Editor, load the Import Manager under the Module menu. Click on File, Import and open the BLP file that you just saved. Now you need to change the custom path. Double click the item inside the import manager, and check the box that says Use Custom Path. Change the path to "FullScreen.blp" with nothing before it and proper case.
Now import the loading screen file. This model file is a new loading screen which is only one texture. Other loading screens have four corners, and require four images. This screen makes it much easier to use. Once you import it, double click it and check Use Custom Path. Change the model files path to just "LoadingScreen.mdx" with nothing before it either.
<img width=\\"501\\" class=\\"attach\\" src=\\"http://world-editor-tutorials.thehelper.net/loading/loading6.jpg\\" border='0' alt=\\"IPB Image\\" />
Importing your files into World Editor.
Lastly, inside the World Editor, click on Scenario, Map Loading Screen. Check the button that says Use Imported File, and select LoadingScreen.mdx. You can still use custom loading screen text on your map as well. You're done! This is what mine looks like when I test my map.
<img width=\\"501\\" class=\\"attach\\" src=\\"http://world-editor-tutorials.thehelper.net/loading/loading5.jpg\\" border='0' alt=\\"IPB Image\\" />
My finished loading screen.[/b]