
IlidanStormrage
New Member
<div align="center">Water Made Easy</div>
<div align="center">By IlidanStormrage</div>
Step One
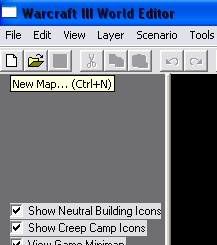
Open World Editor. Select "New Map" from the top left corner.
Step Two
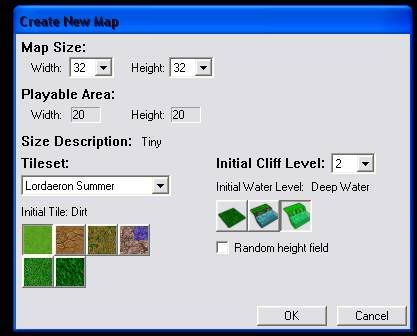
Apply the following settings:
Map Size: 32x32
Tileset: Whatever you'd like
Initial Water Level: Deep Water
Click OK.
Step Three
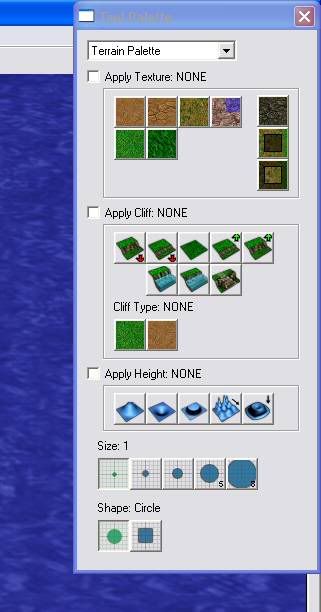
Open the Terrain Pallet if it isn't already open with the "T" key on your keyboard.
Set it to:
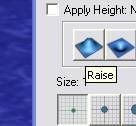
Apply Height: Raise (First square below the heading)
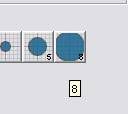
Size: 8 (Last square below the heading)
Step Four
Raise the ground to a level slightly above the water by clicking repeatadly OR holding down the left mouse button and dragging in a circular motion. It should look like this when done:
<img width=\"501\" class=\"attach\" src=\"http://img.photobucket.com/albums/v24/IlidanStormrage/tut_1_06.jpg\" border='0' alt=\"IPB Image\" />
Step Five
Set the terrain pallet to:
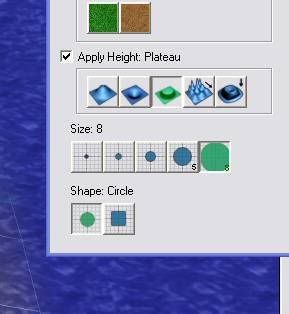
Apply Height: Plateau (Middle square, three from either side)
Size: 8
Step Six
Place the cursor at the center of the hill, hold down the left mouse button, and drag it until you COMPLETELY COVER THE SCREEN. This includes the area in black (borders). The entire map must be plateaued to the same height. It should look like this when zoomed out:
<img width=\"501\" class=\"attach\" src=\"http://img.photobucket.com/albums/v24/IlidanStormrage/tut_1_08.jpg\" border='0' alt=\"IPB Image\" />
Step Seven
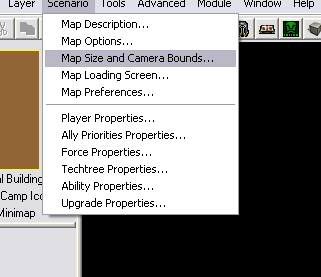
Go to "Scenario" at the menu bar at the top, click, go down to "Map Size and Camera Bounds...", click. A new box will pop up.
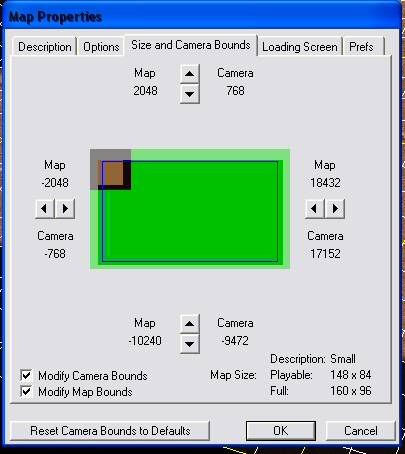
Make sure to check the "Modify Map Bounds" square. Then, click on the arrows to size up the map.
Note: The map size must be multiples of 32 (32, 64, 96, 128, 160, 192, 224, 256).
Step Seven
You can now lower any terrain and it will expose water! Proceed to place a few rivers, some terrain variation, some trees, and you can make yourself a lake that looks much better than Blizzard's cliffs.
<img width=\"501\" class=\"attach\" src=\"http://img.photobucket.com/albums/v24/IlidanStormrage/tut_1_11.jpg\" border='0' alt=\"IPB Image\" />
ZOMG END
<div align="center">By IlidanStormrage</div>
Step One
Open World Editor. Select "New Map" from the top left corner.
Step Two
Apply the following settings:
Map Size: 32x32
Tileset: Whatever you'd like
Initial Water Level: Deep Water
Click OK.
Step Three
Open the Terrain Pallet if it isn't already open with the "T" key on your keyboard.
Set it to:
Apply Height: Raise (First square below the heading)
Size: 8 (Last square below the heading)
Step Four
Raise the ground to a level slightly above the water by clicking repeatadly OR holding down the left mouse button and dragging in a circular motion. It should look like this when done:
<img width=\"501\" class=\"attach\" src=\"http://img.photobucket.com/albums/v24/IlidanStormrage/tut_1_06.jpg\" border='0' alt=\"IPB Image\" />
Step Five
Set the terrain pallet to:
Apply Height: Plateau (Middle square, three from either side)
Size: 8
Step Six
Place the cursor at the center of the hill, hold down the left mouse button, and drag it until you COMPLETELY COVER THE SCREEN. This includes the area in black (borders). The entire map must be plateaued to the same height. It should look like this when zoomed out:
<img width=\"501\" class=\"attach\" src=\"http://img.photobucket.com/albums/v24/IlidanStormrage/tut_1_08.jpg\" border='0' alt=\"IPB Image\" />
Step Seven
Go to "Scenario" at the menu bar at the top, click, go down to "Map Size and Camera Bounds...", click. A new box will pop up.
Make sure to check the "Modify Map Bounds" square. Then, click on the arrows to size up the map.
Note: The map size must be multiples of 32 (32, 64, 96, 128, 160, 192, 224, 256).
Step Seven
You can now lower any terrain and it will expose water! Proceed to place a few rivers, some terrain variation, some trees, and you can make yourself a lake that looks much better than Blizzard's cliffs.
<img width=\"501\" class=\"attach\" src=\"http://img.photobucket.com/albums/v24/IlidanStormrage/tut_1_11.jpg\" border='0' alt=\"IPB Image\" />
ZOMG END
