HellinPelican
Member
Fireteam in Combat Arms is a PVE setting
You and 7 Teammates will face off Hordes of AI bots with unlimited grenades.
This guide will supply you with many tips and tricks as well as a walk though.
What to bring ?
Assault Rifles: M416, M4a1, G36e, K2, FAMAS, AUG A1 pretty much any low recoil scoped AR
Many people say one should bring a sniper. From experience sniper's (from now on SR) are handy however any ammo you pick up WILL NOT replenish snipers or MG's.
A sniper will give you a max of 40 shots, and a AR is 120 shots.
Now if your a good shot the amount of enemies to can kill with and AR is far superior.
However it's your choice.
Also pack you M16 its a good (i use "good" loosely, more like better than a pistol) back up weap and you can "borrow" fallen teammates weaps.
General tips
-Enemies drop grenades a lot -watch out
-When in tight spaces watch who your teammates a killing near you.
they may kill an AI guy that will drop a nade without you knowing, and this may result in your death.
-Ditch your M16 for a better AR/SR if your teammates goes down.
-Don't be a pansy, play on extreme.
-Don't be a jerk and take the health pack, ask you teammates if they need it first (exception being that if you yourself have under 30 hp)
-and finally don't be a douche and leave when you die.")
Enemies
Regular- Cannon fodder, will go down in a few hits only poses a threat in large numbers and can score headshots and nutshots. Also he drops/throws nades. Drops Ammo.
RPG- Arguably the most dangerous, when you see one take him down ASAP, drops health and ammo + nades.
Elite- Tougher than the regular drops nades when they die, but also drops Ammo, Ammo + nades and occasionally health.
Photos coming soon.
Drops photos incoming
Enemies will drop 3 different items
1. Ammo (yellow package) Will refill the ammo of the AR you are using (it will not refill any weapons in your backpack, nor SR or MG)
2. Ammo + Grenades (red package) Will refill all your ammo (even for SR's and MG's) and your grenades
3. Health (green package) The most rare, it will replenish all of your health
Special thanks to CheapeSkater for suggesting this section.
Special thanks to Ashwin for confirming the effect of the Red package.
Walkthough Intro
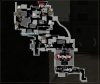
The map can be divided into five parts
Intro-Temple-Tank-A/B/C-Finally
View attachment 133
Intro
Work your way down the street, enemies will spawn in several places
View attachment 131
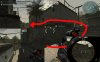
I find the best way to pass this part is to "rush" in to the brick pile/wall (1) on your right, and snipe with your AR (2). When Rushing watch out for AI spawning behind the columns.
View attachment 132
Jump over the destroyed wall and go to the door, enemies should stop spawning. let you team mop the remaining enemies.
Temple
Open the big wooden doors and dispose of the two enemies inside.
make you way carefully to the door ways and snipe.
Be careful because enemies will spawn near the door way (one or the other)
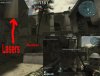
As you enter the court yard clear the snipers on the second level and DON"T TOUCH THE GATES.
Up on the second Floor and to your right you'll see the laser beams of mines.
On the upper laser beam it will go to the column so can angle yourself in such a way to see the mine, shoot it ( the shot is easier with a sniper but totally possible with an AR)
The resulting explosion will cause the floor to collapse. Running up the rubble will cause the door to open and the "elite Sand Hog guard" will attack. Take cover and snipe away, try to take out the RPG guys first.
When the wave finishes make your way up the rubble, take out your knife run and jump. Part of the floor is sticking out, use it as a "step". It will take you a few tries (especially on your first time) don't give up.
View attachment 134
Also don't worry if you don't save the guy. Carry on solider!
Tank
As you leave the temple, if you have a SR snipe the people on the Bus, if you don't
your life will be harder. Go down the alley way don't stay open and snipe, pop out from cover and take a shot then get back to cover. When you make to the end of the alley take note of the ledge running under the windows, kill the three enemies at the top of the stairs (ever careful of the nades) and run along the ledge (back toward the street. to get past the windowsills you can move just a bit to the left and get past them. As you round the corner on the ledge watch out for snipers in the opposite building.
View attachment 135
Now time to kill the tank jump up on top knife the open panel till flames start spewing then jump on the bus and finish it with a pistol. Don't forget to inform your buddies that the tank is done. Brace yourself for a wave of enemies.
You and 7 Teammates will face off Hordes of AI bots with unlimited grenades.
This guide will supply you with many tips and tricks as well as a walk though.
What to bring ?
Assault Rifles: M416, M4a1, G36e, K2, FAMAS, AUG A1 pretty much any low recoil scoped AR
Many people say one should bring a sniper. From experience sniper's (from now on SR) are handy however any ammo you pick up WILL NOT replenish snipers or MG's.
A sniper will give you a max of 40 shots, and a AR is 120 shots.
Now if your a good shot the amount of enemies to can kill with and AR is far superior.
However it's your choice.
Also pack you M16 its a good (i use "good" loosely, more like better than a pistol) back up weap and you can "borrow" fallen teammates weaps.
General tips
-Enemies drop grenades a lot -watch out
-When in tight spaces watch who your teammates a killing near you.
they may kill an AI guy that will drop a nade without you knowing, and this may result in your death.
-Ditch your M16 for a better AR/SR if your teammates goes down.
-Don't be a pansy, play on extreme.
-Don't be a jerk and take the health pack, ask you teammates if they need it first (exception being that if you yourself have under 30 hp)
-and finally don't be a douche and leave when you die.
Enemies
Regular- Cannon fodder, will go down in a few hits only poses a threat in large numbers and can score headshots and nutshots. Also he drops/throws nades. Drops Ammo.
RPG- Arguably the most dangerous, when you see one take him down ASAP, drops health and ammo + nades.
Elite- Tougher than the regular drops nades when they die, but also drops Ammo, Ammo + nades and occasionally health.
Photos coming soon.
Drops photos incoming
Enemies will drop 3 different items
1. Ammo (yellow package) Will refill the ammo of the AR you are using (it will not refill any weapons in your backpack, nor SR or MG)
2. Ammo + Grenades (red package) Will refill all your ammo (even for SR's and MG's) and your grenades
3. Health (green package) The most rare, it will replenish all of your health
Special thanks to CheapeSkater for suggesting this section.
Special thanks to Ashwin for confirming the effect of the Red package.
Walkthough Intro
The map can be divided into five parts
Intro-Temple-Tank-A/B/C-Finally
View attachment 133
Intro
Work your way down the street, enemies will spawn in several places
View attachment 131
I find the best way to pass this part is to "rush" in to the brick pile/wall (1) on your right, and snipe with your AR (2). When Rushing watch out for AI spawning behind the columns.
View attachment 132
Jump over the destroyed wall and go to the door, enemies should stop spawning. let you team mop the remaining enemies.
Temple
Open the big wooden doors and dispose of the two enemies inside.
make you way carefully to the door ways and snipe.
Be careful because enemies will spawn near the door way (one or the other)
As you enter the court yard clear the snipers on the second level and DON"T TOUCH THE GATES.
Up on the second Floor and to your right you'll see the laser beams of mines.
On the upper laser beam it will go to the column so can angle yourself in such a way to see the mine, shoot it ( the shot is easier with a sniper but totally possible with an AR)
The resulting explosion will cause the floor to collapse. Running up the rubble will cause the door to open and the "elite Sand Hog guard" will attack. Take cover and snipe away, try to take out the RPG guys first.
When the wave finishes make your way up the rubble, take out your knife run and jump. Part of the floor is sticking out, use it as a "step". It will take you a few tries (especially on your first time) don't give up.
View attachment 134
Also don't worry if you don't save the guy. Carry on solider!
Tank
As you leave the temple, if you have a SR snipe the people on the Bus, if you don't
your life will be harder. Go down the alley way don't stay open and snipe, pop out from cover and take a shot then get back to cover. When you make to the end of the alley take note of the ledge running under the windows, kill the three enemies at the top of the stairs (ever careful of the nades) and run along the ledge (back toward the street. to get past the windowsills you can move just a bit to the left and get past them. As you round the corner on the ledge watch out for snipers in the opposite building.
View attachment 135
Now time to kill the tank jump up on top knife the open panel till flames start spewing then jump on the bus and finish it with a pistol. Don't forget to inform your buddies that the tank is done. Brace yourself for a wave of enemies.